TraceTech
Product Objective
How to maintain certified traceability throughout the entire process of harvesting, processing, and distribution and/or sale of crops?
The objective of the TraceTech product is:
Track the entire specific process required by the client from harvest to final sale.
Certify the immutability of this trace (decentralizing it to a public blockchain).
Add metadata to each “Step” of traceability according to user interest.
Ability to generate downloadable certificates (NFTs).
Get a public QR code for demonstrating that traceability.
Application for trace visualization and tracking.
Information sources
The TraceTech product obtains user information so that it can be recorded.
Using the application
Here are the main parts of the installable application (Web/Desktop/App):
Types of users and their actions
The value object that creates the traceability application is the “step”. This step can be of 4 types:
Harvest
Processed
Distribution
Certification
The first 3 are common steps where each one stores specific predetermined information. The creation order must always be:
Harvest –> Processing –> Distribution.
The Certification step is reserved for the “certifier” type user and is associated with the field. Therefore, any harvest step will inherit this certification step.
Within the application there are 4 user levels:
Administrator (Can view all users)
Cooperative (They are associated and can see “n” users)
Users (can only see their own data)
Certifiers (Can view all fields)
Finally, this is the relationship between steps and users:
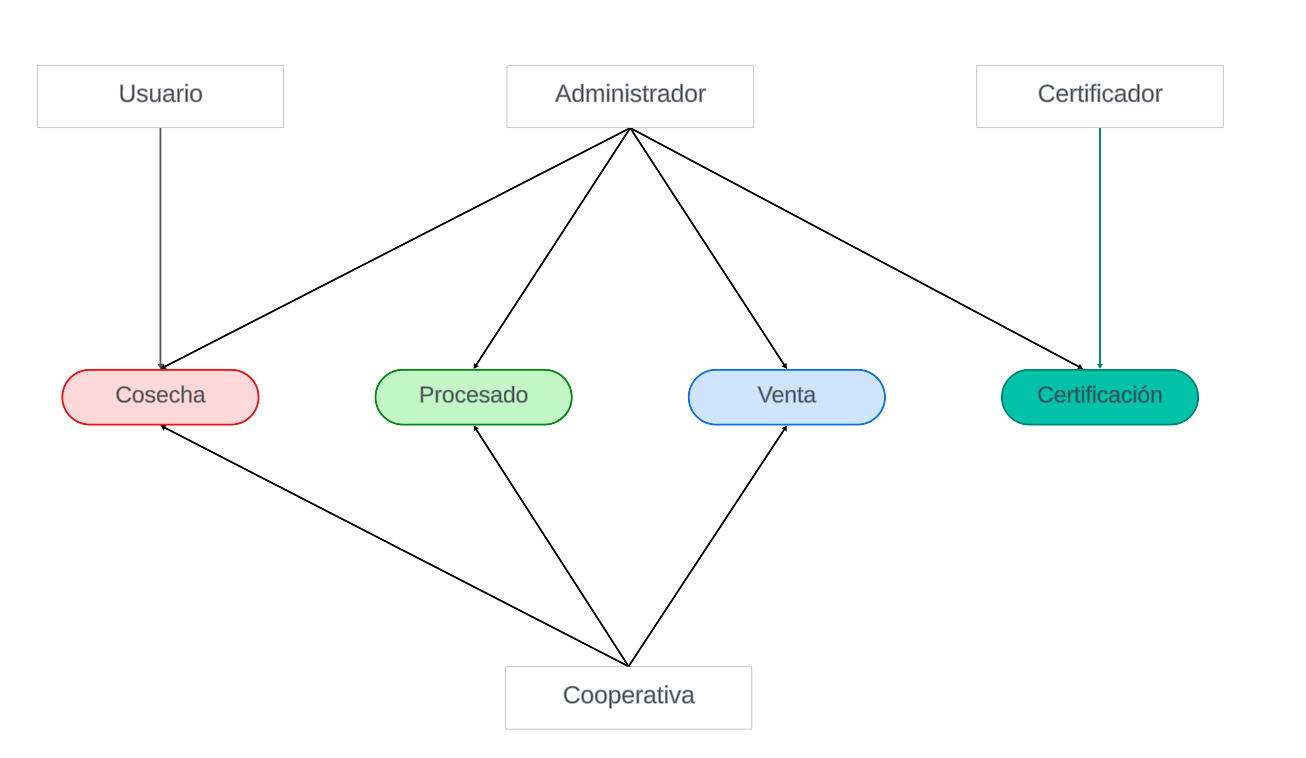
The only restriction of a trace is that it can only have one processing step. If there is more than one processing step, then it should be considered that there is more than one trace.
Trace View
After Login we find ourselves on the trace list page:
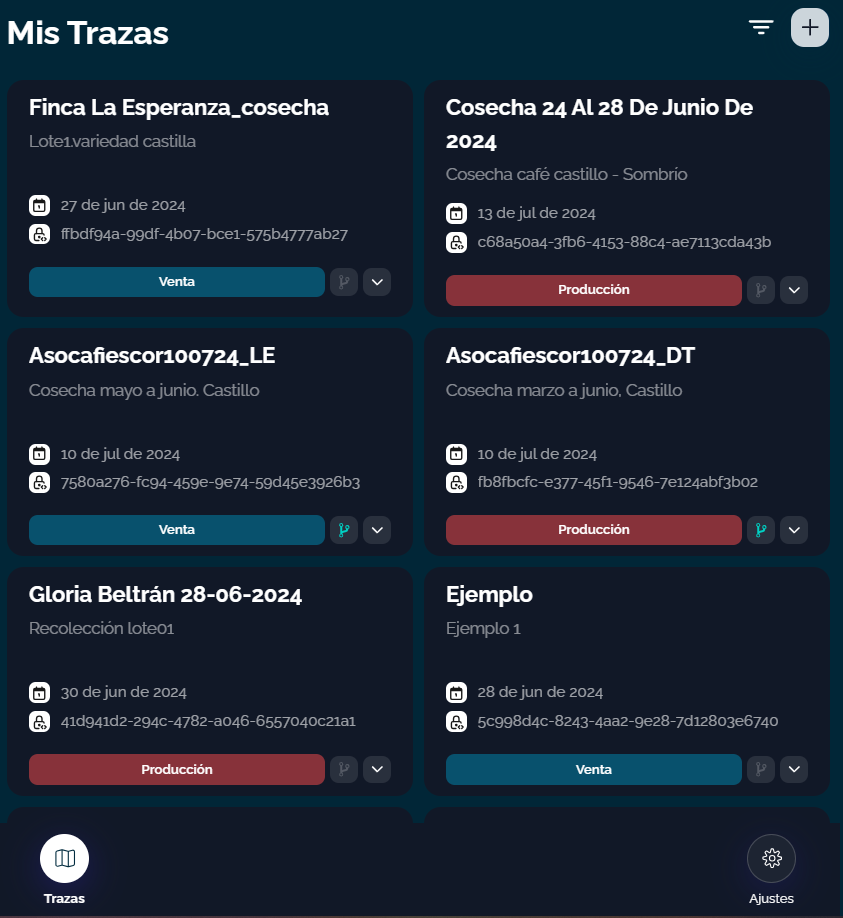
Here we can see each card with a different trace. Each trace has “n” steps and each step has its own recorded information. The trace can also have a name and a customizable description. On each trace card, besides its name and description, we can see its creation date and unique identifier (from now on UUID). We can also visually see on the card which is the last recorded step (harvest-red, packaging-green, distribution-blue), for a more fluid user experience. Finally, next to the last step there are two icons, one indicating that in this trace multiple traces have been combined (possible use case), and another (which is a downward arrow) that shows us in detail the conceptual map of the trace.
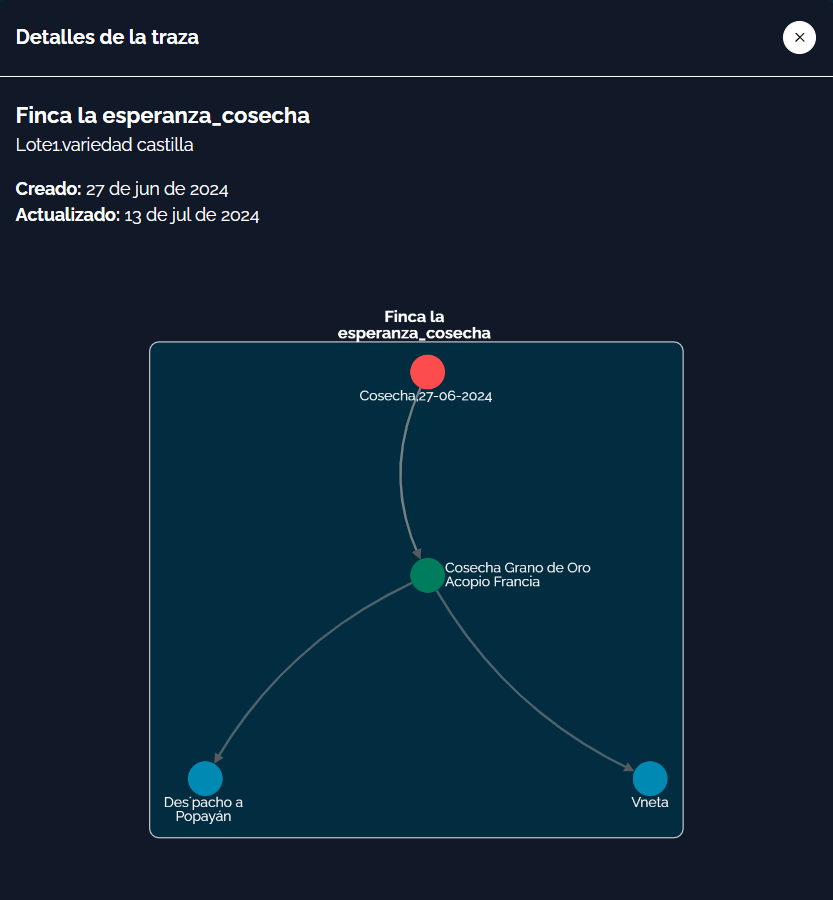
In the trace detail, you can see, for example, in this case, that a harvest step has been recorded, a factory processing step has been recorded, and finally two sales. In this case, there has been no mixing of traces.
Below, we show the same trace detail but from a more complex trace where there has been a union of traces:
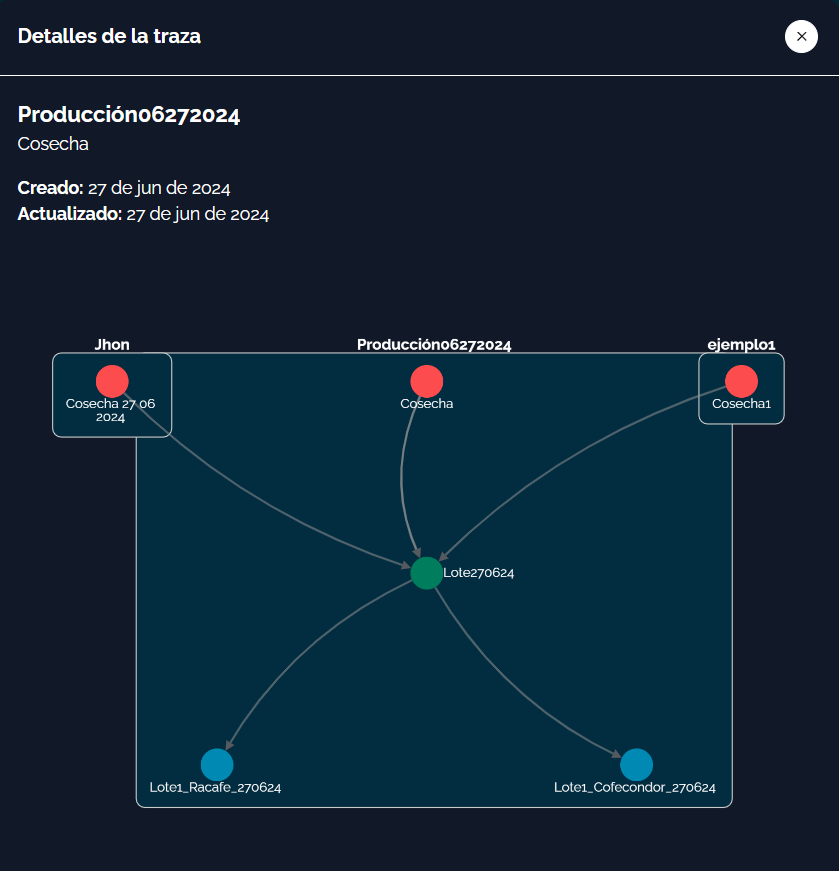
Here we can see one main path and two secondary paths that have merged in the same factory. To be distributed later. There is always one main path and this is decided by the processing step manager (green).
Once we enter the trace (select the card), what the application shows us is:
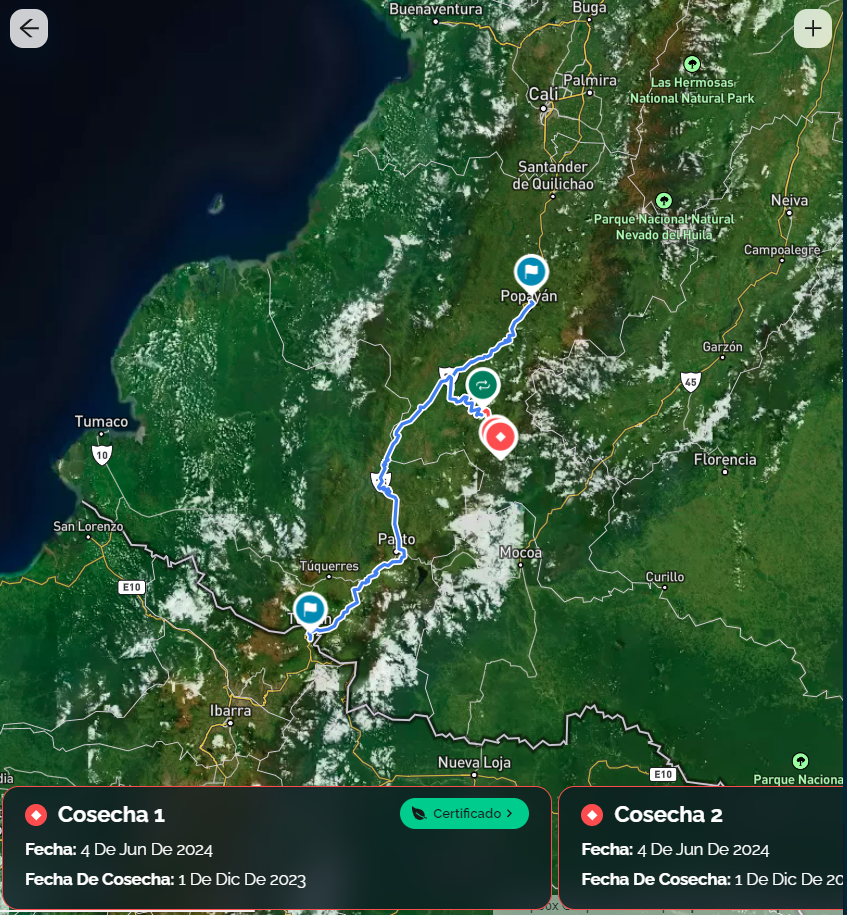
We see a map of the entire route that has been followed between the different points (steps). Below we see cards that, by sliding them sideways, we can see the most relevant information for that step. As we can see in the image, if any harvest step has been done on a certified field, a green button with a leaf will appear that will take us to the certification step.
In the upper right corner there is a “+” icon, this allows us to create steps if our user and the trace state permits it.
If we click on the map point or the card, we will enter the step.
Step visualization
Once we enter the step, the following data is shown:
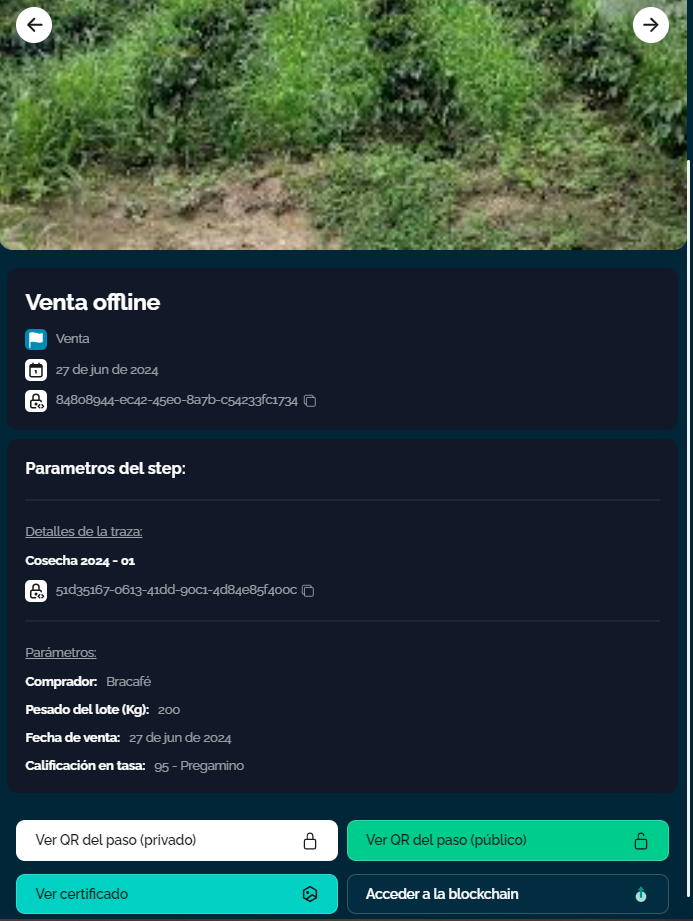
At the top there are a pair of images (one related to the map and field geometry, and the other with an image taken in the field). In the center appears the same information we see in the trace, the most relevant information about that field. Finally, at the bottom we see all the detailed parameters entered for that step.
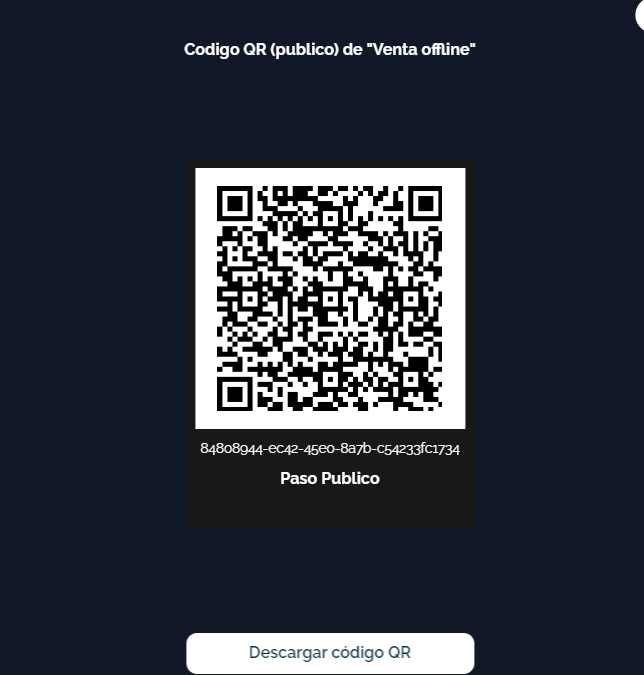
At the end there are 4 buttons. Both the white and green buttons show the QR code (and it can be downloaded). The internal QR is just a UUID of the step. The public QR is a URL that takes you to the application in public mode (you can view, but not edit) for that specific trace:
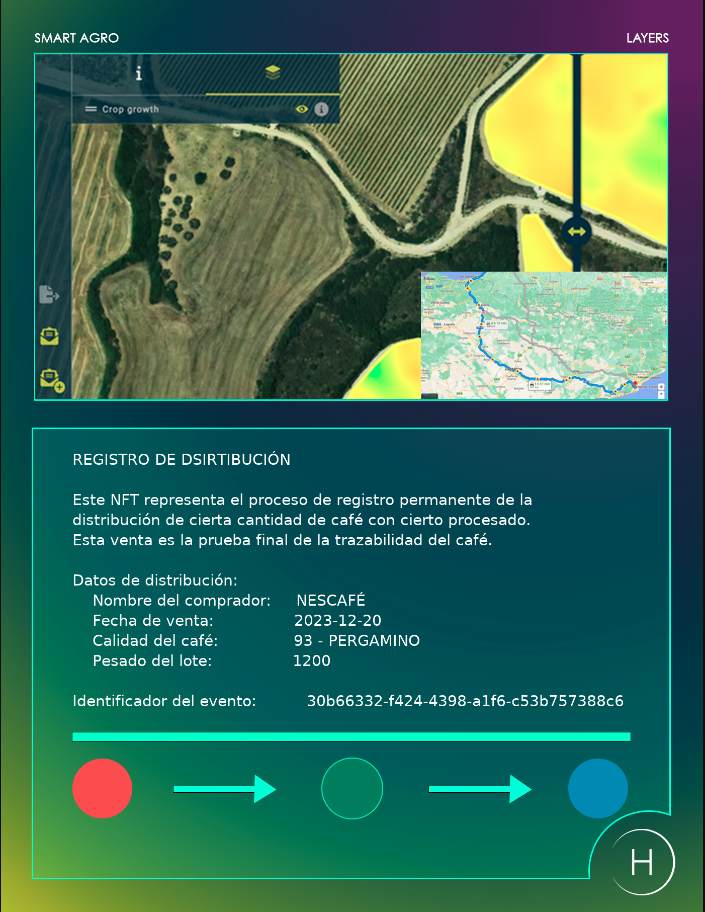
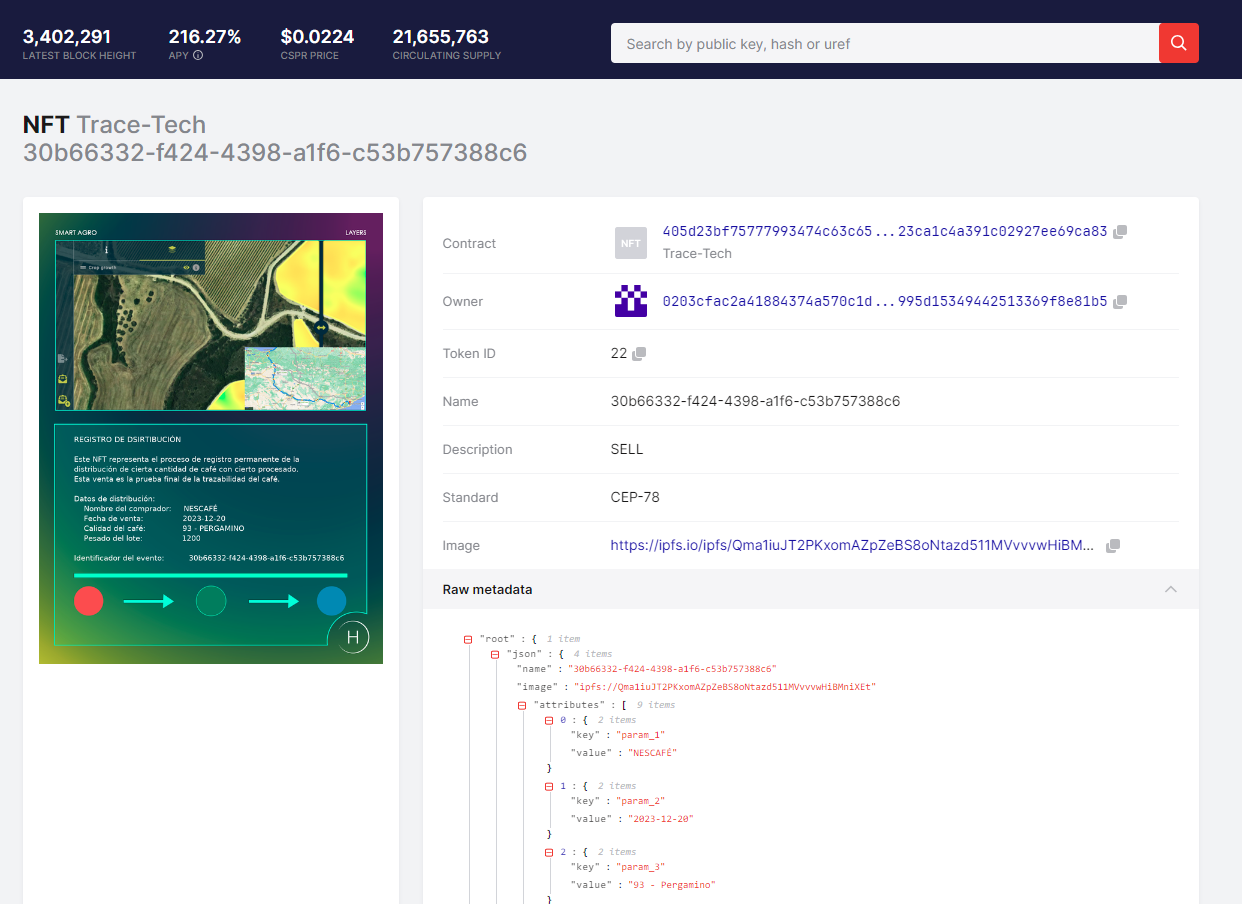
The “View certificate” button downloads a visual representation of the step that is uploaded to the blockchain (NFT, it is a visual information with data that is registered in the blockchain and cannot be deleted or modified). This is an example of the visual image:
The “Access the blockchain” button takes us to the same data along with its metadata in a CASPER NETWORK explorer (the blockchain used). What you see is similar to what is displayed in the app:
This would be the flow for data visualization in the application.
Creating trace
Creating traces will only be possible before creating the first step (harvest). To create a trace, click the “+” button on the “My Traces” home screen, then a form will appear to enter the name and description:

Step creation
Step creation occurs under the following conditions:
After an automatic trace creation.
Manually when clicking the “+” button in the trace view.
Scanning the QR directly from a previous step in the “My traces” tab (there is a button next to the “+”, specifically for these cases).
What we see is a form similar to the one for traces, but with more fields to fill in. All of them are mandatory.
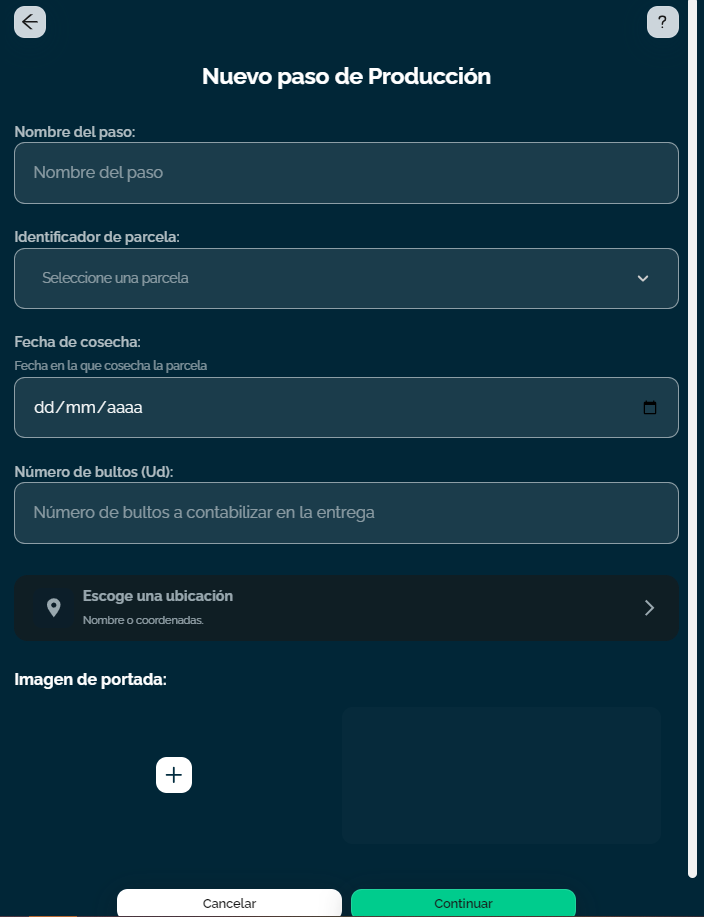
Some parameters like plot are list type, others like date are dictionary type and some are even geolocators on the map. Before finishing the step, we will be asked to upload a representative photo of the step.
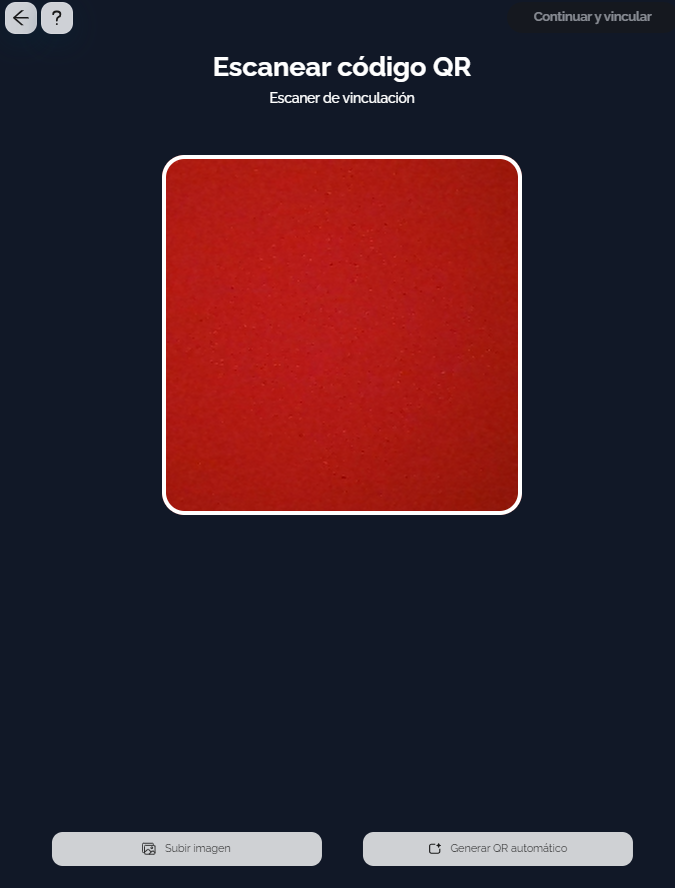
When the step is complete, it will ALWAYS ask for a QR code. We can provide it either by uploading it from a folder, scanning it if we have it printed, or the system can generate it automatically.
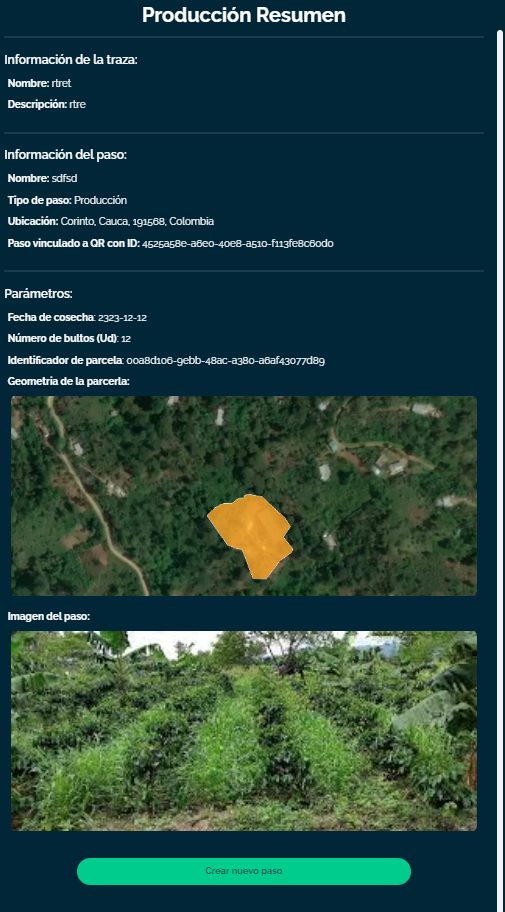
Finally, click continue and a summary of everything we have filled out will appear.
Creating new step and NFT creation will begin (in offline mode the delay time will be shorter, in online mode it will be longer, maximum 10 seconds depending on the device).
Once the step is completed, it will be visible in the trace.
Offline
Basic usage is online mode but there is an offline mode.
It is HIGHLY recommended to put the device in airplane mode if you don’t have a good connection, since when sending data, if the connection comes and goes continuously, the data upload may fail.
During offline mode, an orange bar will be visible at the bottom of the device at all times. The application will work as it does online except for one important limitation:
Multiple different steps cannot be concatenated in the same trace in offline mode.
Apart from this, the operation is the same, emulating data uploading. During trace or step visualization, we will always see an orange “Pending” mark indicating that the step has not been uploaded.
Let’s look at some examples:
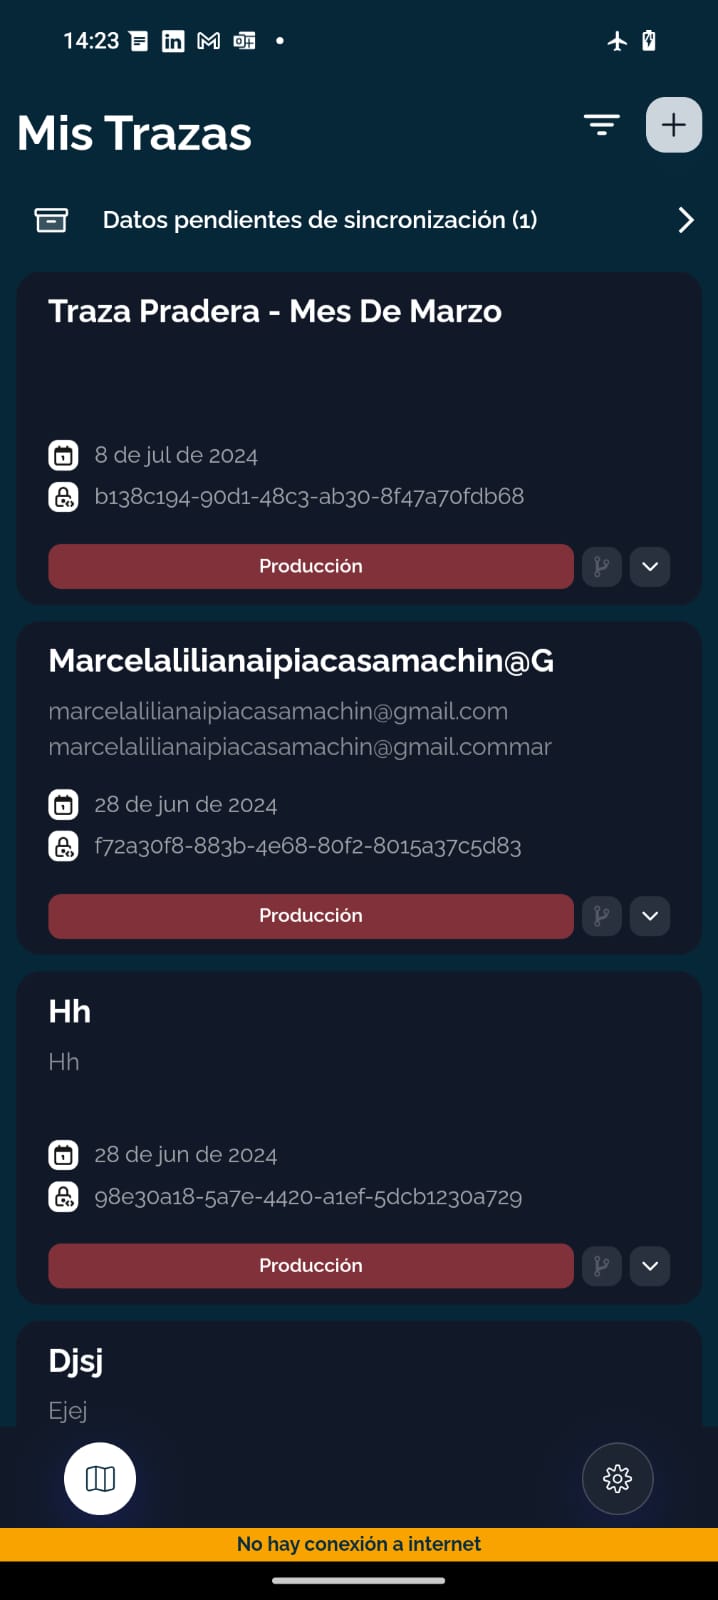
In the image above, a new menu “Pending synchronization data” appears. These are the steps and traces that have not yet been uploaded.

The orange icon indicates that in that trace there are elements pending to upload.
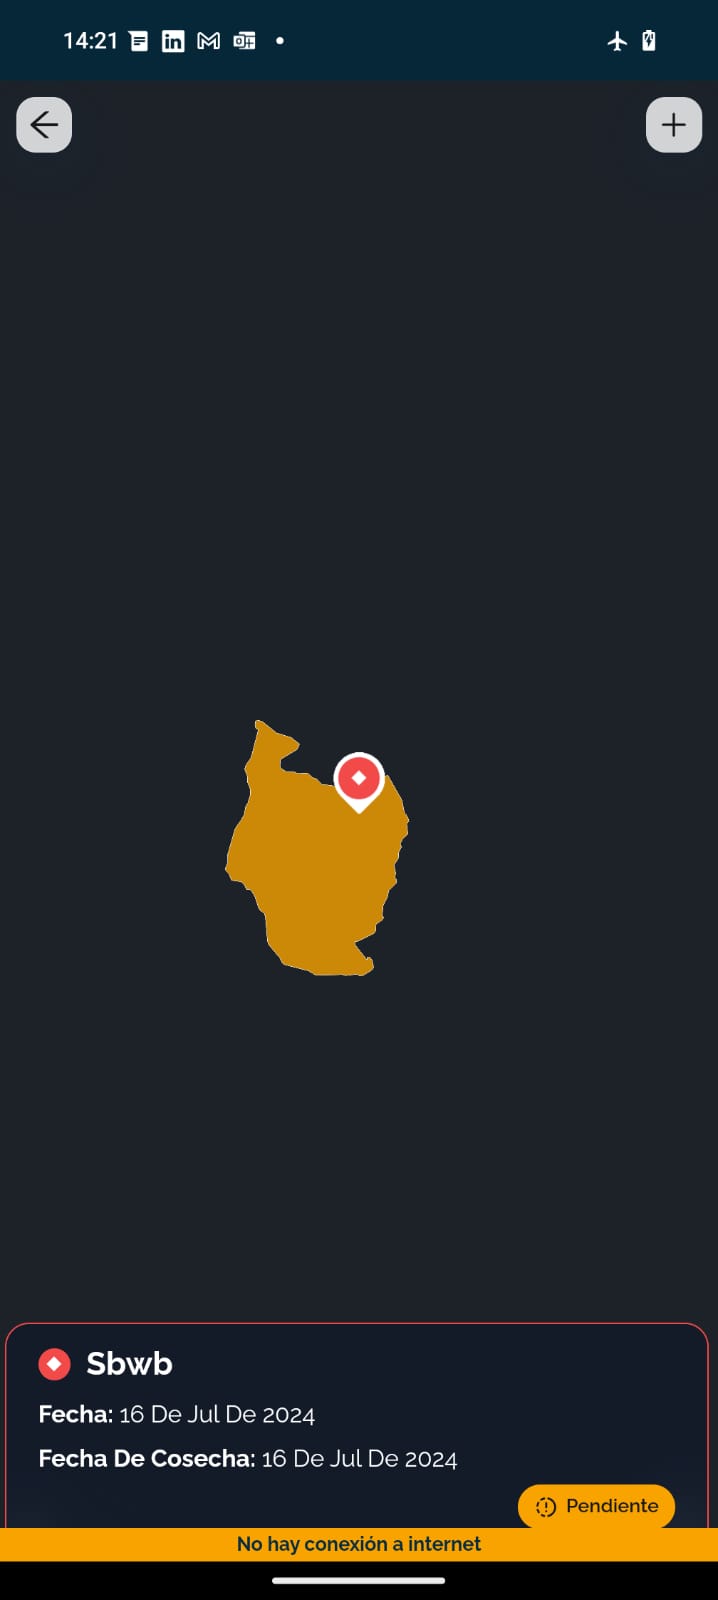
As we can see, while in offline mode the background map couldn’t be loaded. If you want to load it, you need to anticipate this and enter the application (and not logout) and navigate through some track on the map so that the images are downloaded to the device.
Here we also see the “Pending” icon. When entering the step details, where the “+” button is now shown, a trash can button will appear to delete this step (in case you want to delete it or if it fails).
Once we have a good connection or after turning off airplane mode, we can upload the pending steps. This is done by entering the “Pending synchronization data” menu mentioned earlier. There you can see this menu:
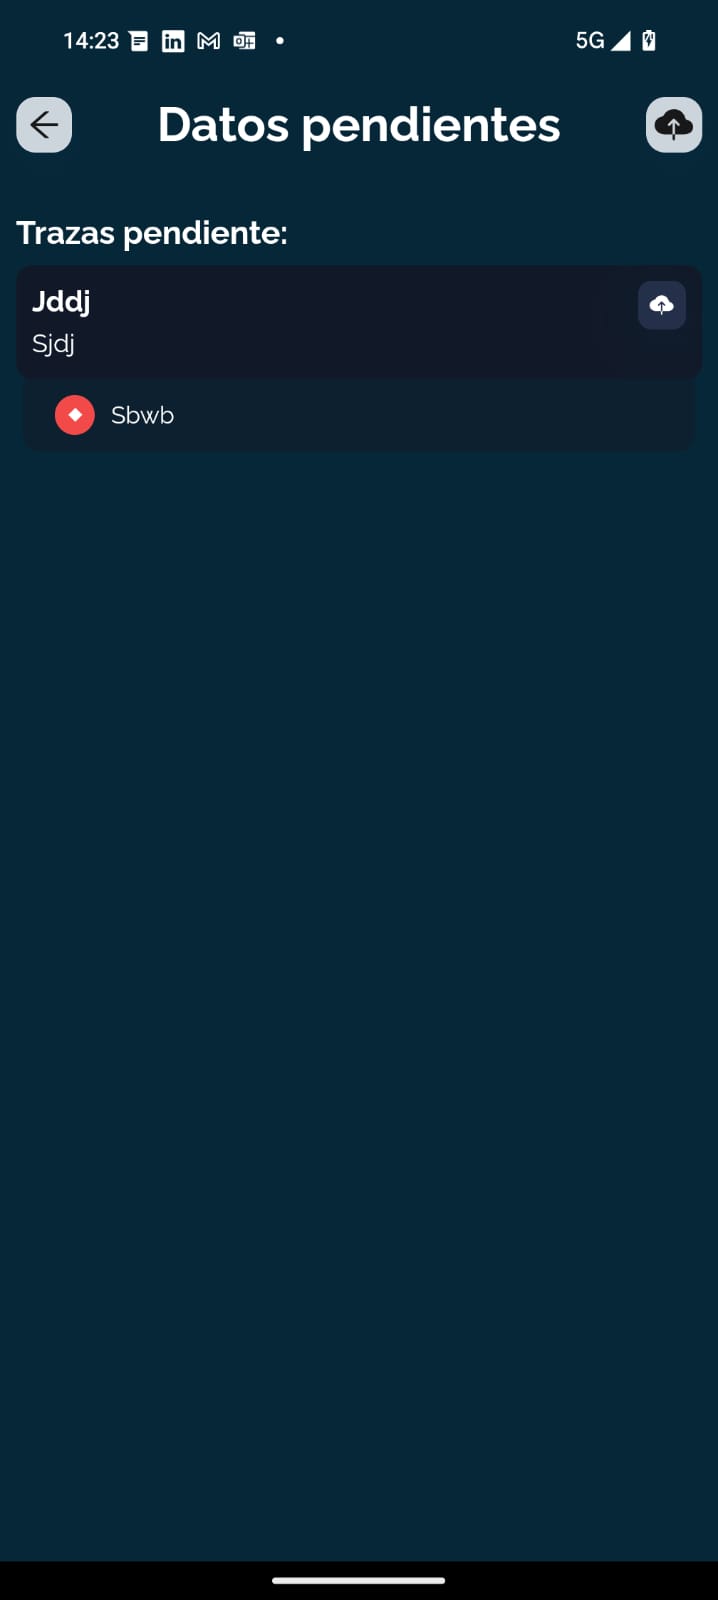
The upload option (cloud icons) will only appear if there is an internet connection. The small icon uploads only that trace and that step, and the general icon uploads all pending items. The total upload, if there are several steps, may take a while (10 seconds per step).
There may be upload failures due to:
Poor connection (There will be an option to retry).
Incompatibility (Trace compatibility incompatibility).
This last case, another user may have updated the trace while this device was offline and the system sees incompatibilities. The first information entered always takes precedence. If a step is incompatible it will never be able to upload properly, in this case you will have to enter the step and delete it.