Layers app
Download and installation
The Layers application is free and can be downloaded and installed through the Play Store for Android systems and the Apple Store for IOS systems. Follow these download links:
Login
Once the application has been downloaded and installed, to log in enter the username and password provided by HEMAV for viewer access.
By default, this data will be stored and thus will only be required the first time you log in.
If you do not remember your login information, you can contact support@hemav.com

Figura 1. Pantalla de Inicio de la APP.
Installments
This is the screen that appears when logging in (Figure 2) using our credentials. On this screen, you will find a list of all available plots.
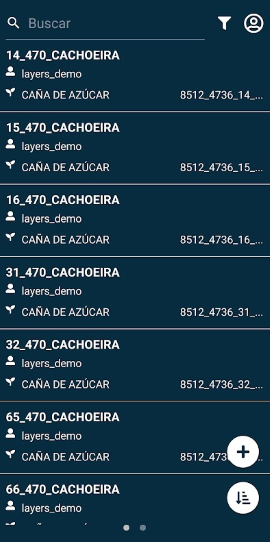
Figura 2. Lista de parcelas.
You can apply filters (Figure 3) or sort them (Figure 4) according to your preferences.
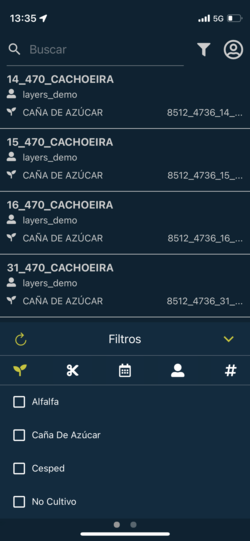
Figura 3. Filtrar.
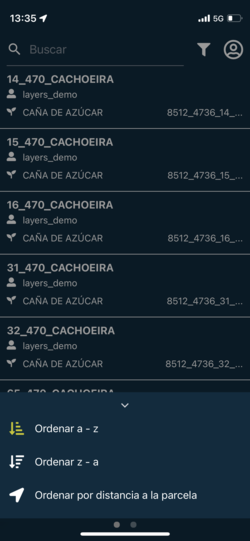
Figura 4. Ordenar.
Similarly, there is a search bar at the top (Figure 5).
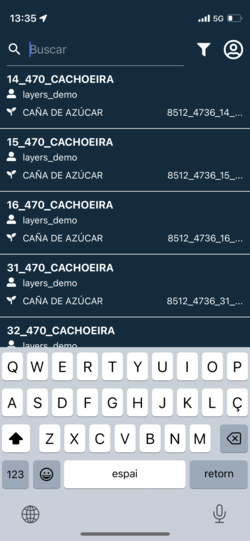
Figura 5. Búsqueda.
Information related to our profile and various settings can be found in the icon located in the upper right corner (Figure 6).
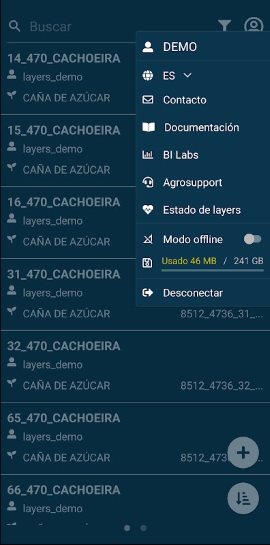
Figura 6. Perfil.
Sample and Gauging Records
To begin, we select one of our plots and then direct our attention to the tab located in the lower left corner labeled “Samples” (Figure 7).
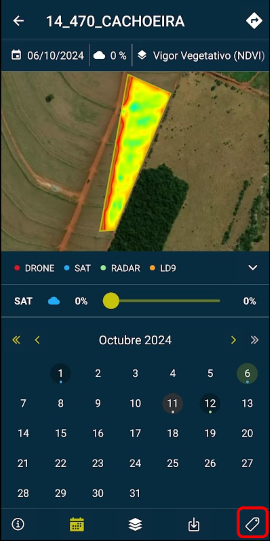
Figura 7. Pestaña de muestras.
At this point, click the add button (“+”) to create a new sample or measurement (Figure 8).
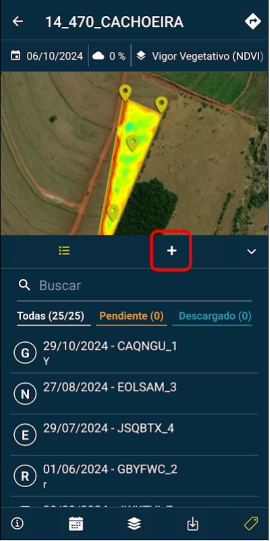
Figura 8. Añadir muestra.
Here is where we will select the sample type and specify the corresponding creation date.
In the center of the screen, we find three icons (Figure 9): From left to right; one for layer selection, another to determine the sample location, and finally, we have the option to attach a photograph.
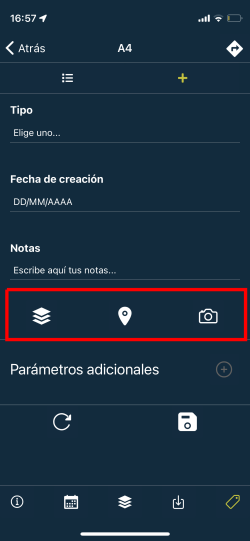
Figura 9. Selección de capas, ubicación de la muestra, adjuntar una fotografía.
It is important to note that parameters must be stored in the “Additional Parameters” section, not in notes (Figure 10). Progressively, we can add all relevant parameters for the sample or gauging.
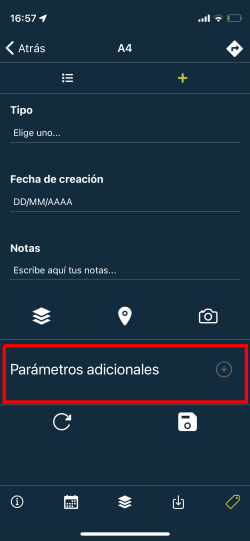
Figura 10. Añadir parámetros.
Finally, we can save the sample by clicking on the icon located in the lower right corner (Figure 11).

Figura 11. Guardar muestreo.
If there is no internet connection at that time, the sample information will be stored in the background, and the user will be notified that they must upload it once the internet connection is restored. It is recommended to use the offline version of the application, which is available in the profile menu (see Figure 6).
Traffic count methodology
Soil Analysis
At each chosen point, REMOVE THE VEGETATION COVER, clean the soil surface by removing any stubble or grass remains.
Using a shovel, make cuts as shown in Figure 9, up to about 20 cm deep.

Figura 18. Como obtener la muestra de suelo.First shovel (making a V-shaped hole) throwing it to the side, and then a second shovel approximately 10 cm thick, Take the sample (500g) from the deep area and place it in a large bag. Therefore, the sample depth is between 20-40 cm deep.
Write down the Plant ID on the sample.
Notes
Do not smoke during sample collection, to avoid contaminating them with cigarette ashes, which are rich in potassium.
Do not take samples in recently fertilized areas, sites near corrals, roads, or places where manure, fertilizers, lime, or others are stored.
Sample preservation:
Soil samples should not be placed under direct sunlight and high temperatures, the main reason is that when soil is removed, it becomes oxygenated and rapidly oxidizes organic matter, along with this some nutrients that are retained by the organic phase are lost.
If samples will not be sent quickly, they should be stored in a refrigerator; household refrigerators are sufficient, taking care to place them in the lowest part and covered with newspaper sheets to protect them from water that may condense on the bag.
Leaf area
We locate the leaves to analyze. (Figure 19).

Figura 19. Ejemplo de hoja a recoger para aforo foliar.The sample must comprise 30 - 40 fully formed leaves.
Put them in the KRAFT bags.
Write down on the plant ID bag.
NOTE: It is recommended to make a sketch of the plot and the ID of the samples, so that once the laboratory data is available there is no confusion.
Then, the gauging points are selected as previously explained (gauging methodology) and are entered into the app as discussed in the previous section.
Required material for nutritional capacity measurements
Soil Analysis
Plastic bags
Box to deposit all samples together
A shovel
Warmer (optional, would replace the shovel)
These are more practical since they extract more uniform samples, are fast and cause less damage to the ground surface. The only disadvantage is that they are not very useful in very dry, compacted soils or those with a lot of rocky material.
Permanent marker to identify the sample with the PLANTA ID from the APP


Foliar analysis
For obtaining samples for nutritional analyses there are two procedures and therefore two types of materials to use:
Laboratory measurement
Kraft paper bags
Box to deposit all samples together?
Cooler: If immediate transfer to the laboratory is not possible, keep samples refrigerated at 5ºC (do not freeze) until shipping, for a period not exceeding 3 days. It would be advisable to obtain a portable cooler made of insulating material along with some cold packs.
Permanent marker to identify the sample
IMPORTANT: add the PLANT ID that appears in the APP to the sample sent to the laboratory.


Field measurement, with portable NIR analyzer
→ Notify HEMAV model and specifications to study compatibility with the system.
Offline Mode: Final Considerations
IF THERE IS INTERNET CONNECTION: the capacity count result will be automatically sent to the system.
NOTE: it is not necessary to wait for the upload to finish before continuing to take samples.
IF THERE IS NO INTERNET CONNECTION: the capacity count result is saved in the background to be sent once the application is opened and the device is connected to the network. The phone will periodically notify that there are pending capacity counts to be sent. Once connected to the internet, it will be necessary to open the application again to send the capacity counts.
If internet is null or has very low coverage in the area where we will take the measurements, it is preferable to deactivate data usage so that the application saves them and later, with good internet coverage, they can be uploaded correctly. To deactivate this option, we can choose airplane mode (it will also disable the GPS signal and cause more difficulty when taking measurements) or disable the phone’s data usage (it will allow us to use GPS signal and facilitate measurements).
If we store the occupancy counts locally to upload them later, we must ensure that internet connectivity is good when doing so. That is, before opening the app to upload these occupancy counts, we could perform a connectivity test (google.com).
En el caso de subir los aforos y la APP muestre ‘Cargando…’ por un tiempo de más de 5 minutos, deberemos cerrar la aplicación por completo y volver a abrirla (constatando que la conectividad a internet es buena).
The email for processing in case of any questions is: postpro@hemav.com
Reports in the Layers application
List of Reports
Now we have two report lists:
Reports list screen (when swiping)
In the selected field screen, we have the reports tab
Reports are filtered by status:
To-dos
Pending
Downloaded


Filter Reports by current season/all
Now you have the ability to filter reports by current/all seasons.
Use the three-dot icon in the upper right corner.
You have a switch to filter.
Filtering options:
Current season: the related date (or creation date) of Reports is included in the current season of Reports fields.
All seasons: shows all Reports.
Open/close multiple Reports
Now you have the ability to open and close multiple reports.
Press and hold a report to reveal checkboxes and select multiple reports.
By using the three-dot icon, you can filter reports by current season or all seasons, and also select all to interact.
In addition, you now have two new buttons available: Close or Open the selected reports.
To return to the initial view, press the “Back” button in the upper left corner


Creating plots
The plot creation tool allows digitizing geometries for new fields from the mobile application, in both online and offline mode.
It has been specially optimized to allow the digitization of plots in situations where using the web interface it is not possible to digitize these geometries. Some cases where this may occur are when the satellite information of the background map is outdated, in forested areas where fields are under tree canopies, even cases where it is difficult to identify or locate the specific points where a field changes shape.
For this purpose, a functionality has been implemented that allows the use of the device’s GPS positioning to identify the desired points, even allowing the digitization of geometries without any satellite imagery present, as long as the person and device used are at the actual position of the field to be digitized.
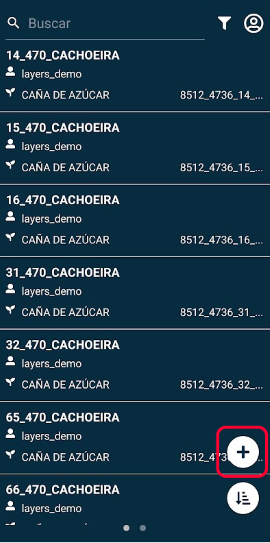
To start a digitization, click on the “+” button, which is present in the initial window of the plot list. It is active in Agro-user or Cooperative accounts.
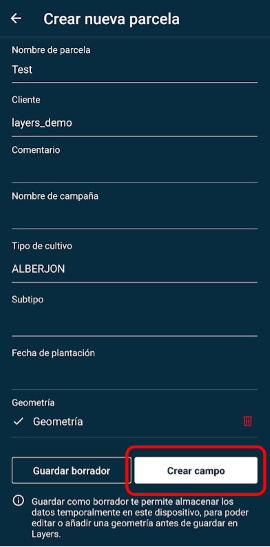
After pressing this button, a form appears to be filled out with the details of the field that will be digitized.
![]()
The fields “Plot name”, “Client” and “Crop type” must be filled in to allow saving as a draft. If they are not completed, they are highlighted in red.
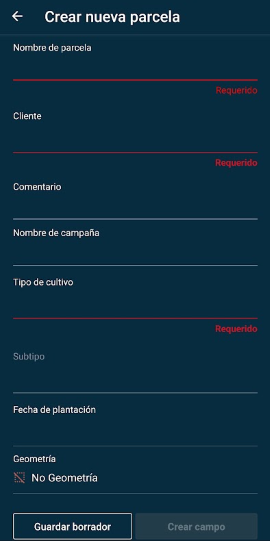
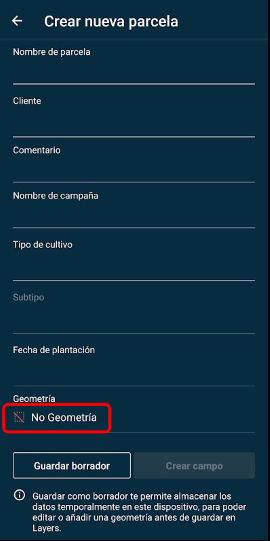
By clicking on the “No Geometry” field, you access the map view to start digitizing.
The actions that can be performed from this window are the following:
Exit or return to form.
Validate geometry and return to form.
Area and perimeter information.
Remove geometry to restart digitization.
Center map view on device’s GPS position.
Add vertex to polygon (sequentially)
Go back one step in digitization. (Delete last point)
Recover a digitization step. (As long as no new points have been manually created)
Central position of the screen where a point will be added when pressing the “+” button or the position where the map will be centered when pressing the “GPS” button (5)
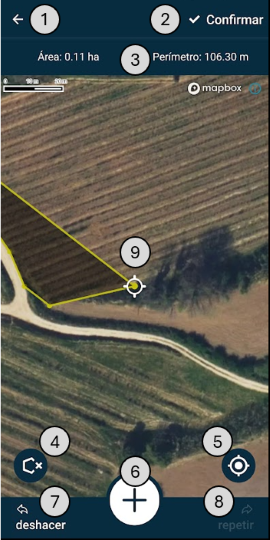
In the drawing window, you can slide the map to center on the desired position to add a vertex to the polygon (9), as well as pinch to increase and decrease the zoom level.
By pressing the “+” button (6), a point is added to the central position of (9).
Moving the map repeatedly and pressing “+” (6) at each position will shape the geometry of the plot.
If for any reason there is no updated background image that can be used as a reference for the plot digitization, the person can move around the perimeter of the plot, and center the map position using GPS coordinates by pressing button (5) and then (6) to add a vertex at this position.
At any time you can undo (7) a step to add a new point in the corrected position, or redo (8) if no changes have been made after undoing (7).
Once the desired digitization is complete, it can be validated by clicking the “Confirm” button (2). This action redirects to the form, where you can see that the geometry field is validated.
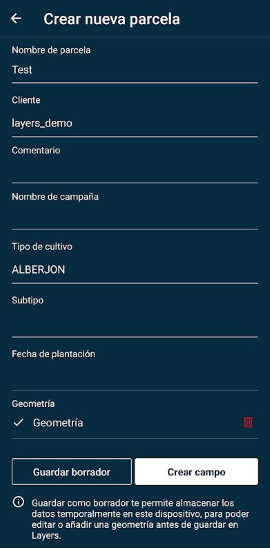
In online mode, it allows choosing between “Create field” and storing it on Layers servers, or “Save as draft”, which allows temporary storage of data on the device from which the plot is being created, to add or edit geometry, or plot data, before saving to Layers.
By choosing the “Save draft” option, the created plot will be added to a “Pending” list in the Layers app. This data is stored locally on the device. It is not synchronized with Layers servers until confirmed by pressing “Save all” in the pending list, or “Create field” in the plot form or details view.
Save as draft can be useful in cases where you want to prepare the plots to be drawn from an environment like an office, to later digitize the geometries in the field.
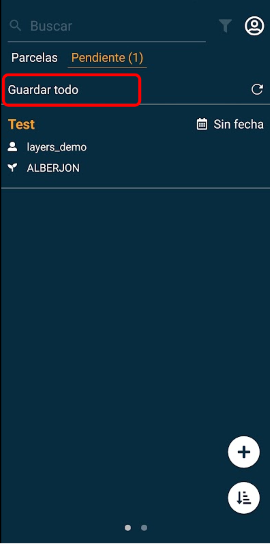
“Save all” in the pending list will save to Layers servers all those parcels that have a complete form and a drawn geometry.
Parcels without geometry will continue to appear in “Pending” until they have a valid geometry.
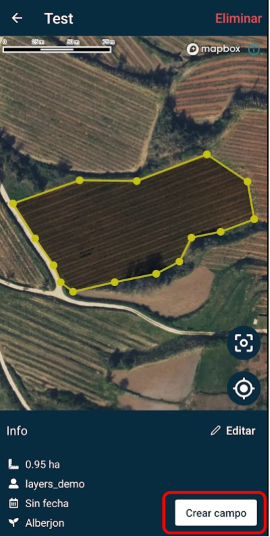
The current version of Layers app does not allow editing plots. To edit previously created plots, or plots created through the Layers app, that are not in “Pending” draft status, you must use the Layers Web version.