Hemav Planner
What is Hemav Planner?
HEMAV Planner es la herramienta para la planificación, configuración, seguimiento y análisis del vuelo del UAV. Actualmente el SW de control HEMAV Planner (HP), tiene soporte para las plataformas de vuelo HAR8, HAR9, HP2 (configuración bungee y catapulta) y HP2k.
Minimum system requirements
Intel core i3 or similar 4GB of RAM Windows 7, 8, or 10 Minimum 700MB of Adobe Reader space installed
Index
Hemav Planner Screens
Flight Data - Flight Data
Side Buttons
Flight information and warnings
Flight information
Warnings and alerts (right side)
Map
HUD
Flight plan
Side menu
Geographical information
Waypoints edition
Actions on the map (right click)
Configuration
Compass calibration
Calibration of accelerometers
Accelerometer leveling
Compare parameters
Write parameters
Save to file
Image Check
Download internal logs
Simulation
Battery levels
GeoValla “FenceZone”
Update
Hemav Planner Screens
The first window we find when starting the program is the screen platform selection.
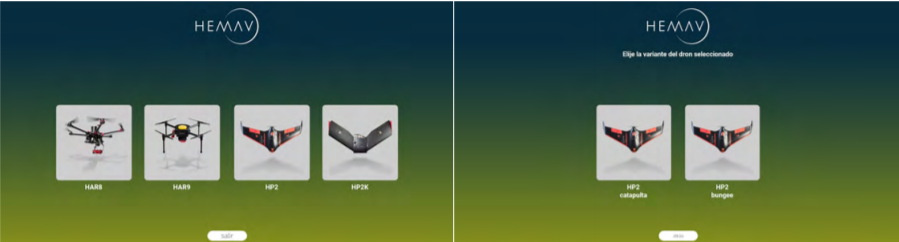
The operation of the program depends on the platform you choose. Only in the case of the fixed wing HP2 will give us the option of catapult or bungee.
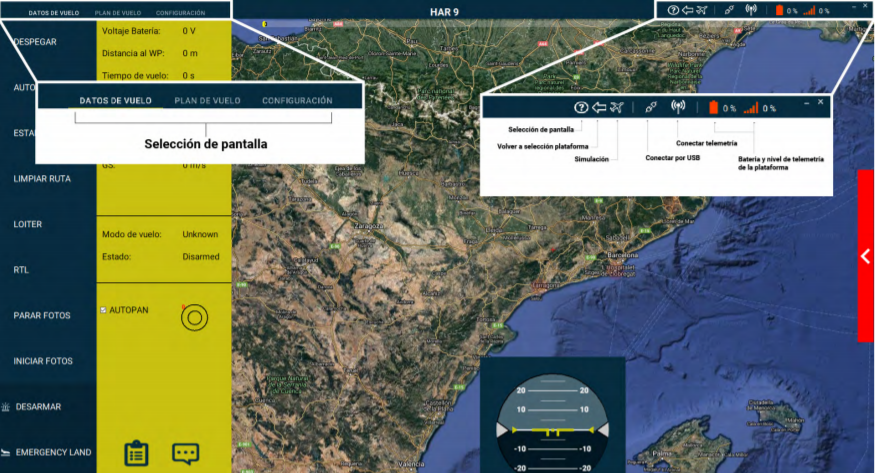
Once the platform has been selected, the program is divided into three main screens:
Datos de vuelo: Seguimiento y control de la misión
Plan de vuelo: Planificación de la misión
Configuración: Modificar parámetros y calibraciones de las plataformas. Para acceder a cada una de estas pantallas, lo haremos a través del menú superior.
Flight Data - Flight Data
Flight Data is the screen intended for field operation. It includes the preflight checklist, the mission follow-up during the flight, the execution of control actions (start mission, return to house, emergency landing…), essential information during the flight and the notices. Below are the buttons and fields for information on this screen.
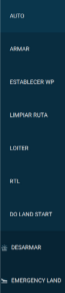
Side Buttons
Auto: changes the flight mode to automatic.
ARM/Removal: performs engine assembly for HAR8 and HAR9, leaves the platform waiting to be launched in the case of the HP2 and HP2K.
Set WP: allows us to send the platform to a different WayPoint of the current one.
Clear route: clears the waymarks and photographs made of the screen.
Loiter: Modify the flight mode to Loiter. We can choose between maintain height or go down to 50 m. The drone maintains flight altitude and is static at the point when the button is pressed. In the case of the wing fixed, spins around the point where the Loiter has been activated.
RTL: change the flight mode to RTL (return to launch)
Stopping photos: stop making photo shoots. (HAR8 and HAR9)
Start photos: take photo captures again. (HAR8 and HAR9)
Disarm: changes the status to disarmed and stops the motors.
Emergency land: activate the “Emergency land” flight mode and activate the parachute to make the emergency landing.
Flight information and warnings
We have two information areas, left side (green background) where displays essential information in real time and the the right where possible warnings and alerts are indicated to have in account. Flight information:
Battery voltage: except HAR8, all platforms give battery voltage information. [Volts]
Distance to WP: remaining distance to the next waypoint. [meters]
Flight time: total time of the flight from takeoff. [seconds]
Height: height of the platform in relation to the launch site. [meters]
Next WP: indicates the identifier of the next waypoint. [integer]
GS: ground speed. [meters/second] AS: air speed. [meters/second]
Flight mode: indicates the flight mode (Auto, Loiter, RTL, …)
Status: tells us if the platform is in an armed state (‘armed’) or disarmed.
Autopan: allows us to decide if the map is self-centered when the platform is on the move.
Wind direction: wind speed and direction [meters/second] In this same column, we have the button for pre-flight requirements and messages.
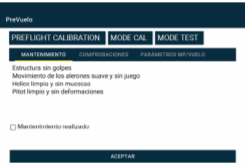
Pre-flight: indicates the checks we will have to make in the platform. You have to check and click on the each section.
MODE CAL (HP2 and HP2K): Modifies the flight mode to manual so that to do the calibrations without the wing servos working.
MODE TEST (HP2 and HP2K): Modifies the flight status to STABILIZE to to be able to check the proper functioning of the wing servos.
PREFLIGHT CALIBRATION: sirve para calibrar el PITOT del HP2 y HP2k. Al finalizar, presionar aceptar.
Messages: this pop-up window shows all the messages, both from the program and those received from the platform. It is advisable to keep it open during the flight.
Warnings and alerts (right side)
Initially, this window is hidden by showing only an arrow. If you receive any important notices, the side and we will see the error or problem in red. We can’t close until the mistake is solved. If we press the arrow, the window opens, where it indicates us:
GPS signal quality
Drone Vibration(VIBE) - opens a window with more information
EKF Status (Drone Sensor Errors) - opens a window with more information
Number of photographic captures
Number of available GPS satellites
HDOP: Indicates the accuracy of the GPS in horizontal. We should always check that the number shown is less than 2.
If there are any additional alerts, they will be shown here in red. Additional writing is added at the bottom.
Map
Map based on Google maps. To zoom in and out, we can do it with the mouse wheel or if we have a trackpad (in laptops) we will do it with two fingers. With the right click we can do the action of “Trigger camera NOW”, which will make an extra photographic capture.
HUD
In the lower central part, we have a simplified HUD that indicates the roll and pitch of the platform through the artificial horizon in degrees.
Flight plan
On the “flight plan” screen we can plan the mission. You can plan manually or with the help of the program on the basis of a polygon drawn on top of a plot.
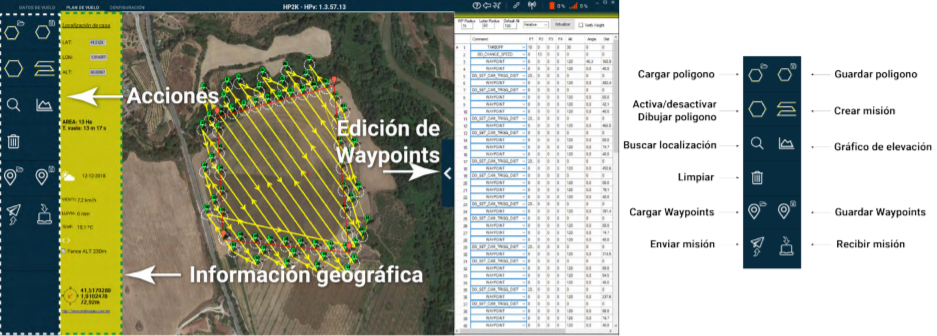
Side menu
In this menu we will find the main actions to plan a mission.
Guardar polígono: una vez dibujado el polígono, podemos guardar un archivo .poly para poder cagarlo en futuras misiones.
Cargar polígono: podemos cargar un archivo .poly con un polígono. Solo se puede tener un polígono activo, si cargamos un polígono, se borrará el que tenemos en pantalla.
Activar/desactivar dibujar polígono: con esta herramienta conmutamos entre dibujar poligono y añadir WayPoints.


Crear misión: nos crea una misión automáticamente dentro del polígono dibujado. Nos abre el survey grid del mission Planner. No hace falta modificar nada, al escoger una plataforma al inicio, nos carga los datos básicos para un vuelo automático. En el caso de HP2 y HP2K hay que añadir la senda de ascenso y descendo en funcion de la dirección del viento.
Buscar localización: Podemos buscar una ciudad, pueblo o zona y nos centra el mapa en ella.
Gráfico de elevación: Una vez creada la misión, podemos ver una gráfica de comparación con los datos de elevación del terreno con los datos de elevación de la plataforma. Es importante recalcar que estos datos son extraídos de Google maps, por lo que son aproximado y solo pueden ser tomar como referencia. Recomendable realizar esta comprobación en todas las planificaciones.
Limpiar: podemos borrar el polígono, la misión o ambos.
Guardar WPS: podemos generar un archivo .waypoints o .txt con los datos de los waypoints.
Abrir WPS: podemos cargar archivo .waypoints o .txt con los datos de los waypoints.
Leer WPS: una vez conectada la plataforma al programa, podemos leer los WPS que el dron tiene en su memoria.
Escribir WPS: una vez conectada la plataforma al programa, podemos escribir los WPS en la memoria -del dron.
Geographical information
In the geographic information bar we will find:
Home location: if the platform is connected, we can geolocate the starting point of the flight.
Coordinates of geolocation of the platform
If there is a polygon drawn, it indicates the size in hectares.
If there is a mission created with the automatic tool, it indicates the estimated flight time. Attention: If we load a mission directly with the WPs previously created cannot calculate this time for us. Only us provides this information when creating the survey grid.
Weather information for the area. It allows us to see the information weather for the current day and the next four days.
Fence ALT 230m: allows you to set the maximum height of the platform to “230m instead of the default 150m. This parameter is saved on the platform when writing the WPs.
Pointer geolocation (mouse)
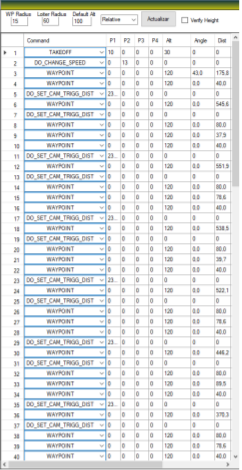
Waypoints edition
Once the mission is created we can review and edit each WP and its parameters. Each row identifies a waypoint:
Number: Waypoint identifier
P1 - P4: command parameters. For example: the command DO_CHANGE_SPEED accepts in P2 the speed value in m/s.
Alt: height through which the platform must pass by the waypoint.
Angle: height difference with the next WP in degrees (not editable)
Dist: distance in meters to the next WP (not editable)
Delete: delete the row/waypoint.
Lat: latitude of the waypoint. (GEO coordinates)
Lon: longitud del waypoint. (coordenadas GEO) Una vez editados los WP, debemos apretar el botón de guardar. Despues de guardar, tenemos la opcion de actualizar los datos, por si vemos algún valor incorrecto, o hemos movido un waypoint des del mapa. Podemos borrar multiples WP a la vez con la tecla Suprimir.
Atención:no modificar los datos sin conocimientos de los parámetros usados en ArduPilot. Hemav Planner crea automáticamente los WPS y los parámetros necesarios para cada plataforma. Puedes consultar aquí la lista completa de comandos.
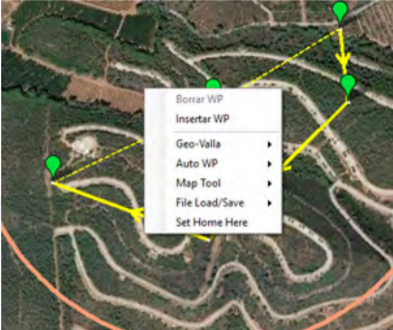
Actions on the map (right click)
By right clicking on the map, we have:
Borrar WP: clic derecho encima de un waypoint para poder bórralo.
Insertar WP: nos permite insertar un WP después del WP deseado.
Auto WP: nos permite crear misiones tipo espiral, circunferencia, etc…
Map tool: permite modificar ciertos parámetros del mapa.
File load/Save: permite cargar datos al mapa como las
Set Home Here: permite definir el punto de inicio. Esto es útil para hacer simulaciones o planificar las misiones en campo antes de conectar la plataforma
Configuration

In the configuration screen we can calibrate and load parameters to our platform
Compass calibration
Para calibrar la brújula, debemos usar los valores por defecto solo modificando el Fitness, que debe ser relaxed (si calibrando en default no calibra correctamente) y seleccionar el botón de start. Las 3 barras inferiores irán progresando hasta llegar al final. Durante la progresión de las barras, debemos orientar el dron primeramente sobre sus 6 ejes, los mismos del accel calibration, y posteriormente rotar 360º sobre cada uno de esos ejes. Una vez realizada la calibración, en caso de ser correcta, el dron emitirá tres pitidos ascendentes. En caso de ser errónea emitirá uno, o dos descendentes. Tras una calibración correcta es necesario reiniciar el dron.

Calibration of accelerometers
Follow the instructions on the screen by clicking and pressing enter.
Accelerometer leveling
Follow the instructions you see on the screen when you click.
Compare parameters
We can load a parameter file to compare them, and if we want, “use them on the connected platform.
Write parameters
Write parameters to the connected platform.
Save to file
Create and save parameter file.
Image Check
Esta herramienta nos permite hacer un
control visual de las imagenes y de las placas
de calibración capturadas con la Micasense
despues del vuelo.
Debemos cargar la carpeta superior de la
tarjeta SD, tipo 0001SET, es decir, la carpeta
que contiene todas las subcarpetas que
Micasense crea.
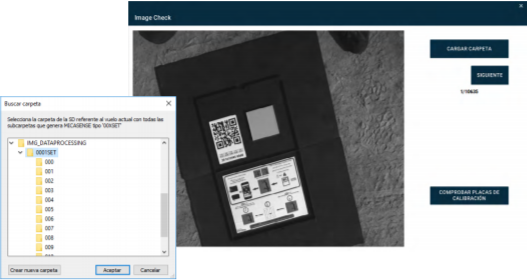
Once the correct folder is loaded, we can go through the entire image set with 5 image jumps. It is important to check that the images do not detect the sky, parts of the platform type “legs”, cables, etc. With this tool you can also see if there are clouds in our images.
Mas abajo, encontramos el botón para hacer la comprovación de las placas de calibración. Esta herramienta nos indicará el numero de placas de calibración y su numero de serie. También nos informa en que parte del image set se encuentran.
Simulation
Finalmente, en el menú superior derecho encontraremos el botón de simulación (icono de avión).
Es muy útil esta herramienta para practicar planificaciones y vuelos ficticios.
El procedimiento es muy simple, debemos clicar encima del botón de la plataforma que queremos simular.
Previamente, puede ser recomendable subir el número de Sim Speed para acelerar las simulaciones. El resto de los
parámetros no son recomendables de modificar.
Una vez cargados los parámetros podemos cerrar la ventana de simulación.
Una vez estamos conectados al modelo simulado, desde la pestaña datos de vuelo y plan de vuelo interactuaremos
con el dron simulado como si de una plataforma verdadera se tratase.

Battery levels
One way to monitor the battery level is with the battery voltage indicator on the flight data screen, but if the maximum and minimum voltage values are not known it is best to be guided by the battery data in the upper right hand corner. These battery indicators consist of an icon and a percentage value. The icon indicates the remaining percentage according to its color:
 Icono verde si la batería restante es
mayor del 30%.
Icono verde si la batería restante es
mayor del 30%.
 Icono naranja si la batería restante se
encuentra entre el 30% y el 10%.
Icono naranja si la batería restante se
encuentra entre el 30% y el 10%.
 Icono rojo si la batería restante es
menor del 10%.
En este caso, la plataforma entrará
en modo RTL (HAR8 y HAR9) o DO_
LAND_START (HP2 y HP2K).
Icono rojo si la batería restante es
menor del 10%.
En este caso, la plataforma entrará
en modo RTL (HAR8 y HAR9) o DO_
LAND_START (HP2 y HP2K).
GeoValla “FenceZone”
In Hemav Planner we have two GeoVallas or FenceZone. An inner fence (circular) that tells us the safe zone where to plan our mission. An exterior (octagonal) fence that delimits the maximum distance in which our platform can operate. If the platform passes the outer fence, it will enter RTL mode.
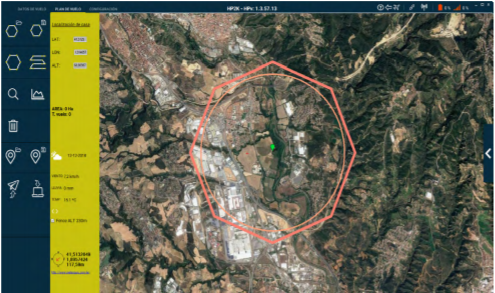
Los radios y alturas por defecto de estas vallas son distintos para cada plataforma. Se indican también los limites
inferior y superior de la propia valla.

On all platforms, the maximum default height is 150 m. Remember you can increase this height to 230 m in the “FLIGHT PLAN”
Update
When we open the application, if there is an internet connection, it will automatically check for updates. If there is a newer version, it will ask us if we want to update. In this window, the most important changes of the new version will be indicated.
If the internet connection is not stable, it is preferable not to update. If we do update the version, the system will start downloading the files automatically. Once this process is completed, the application will automatically restart. If at any point in the process, an error occurs, it is possible that the application has become corrupted due to problems with the connection to the server. In this case, it will be necessary to reinstall the application.